Friday, April 27, 2012

My very own Baked Chicken Curry!

It has been a slow day today! After cleaning this morning, my daughter, by dogs and I just napped the day away. I love that rain helps me catch the much needed zzzz's.  I started to redecorate my "Girlie Room/ Guest Bedroom" last night, I think the drum table I purchase from the flea market for $5 will be a great little addition in there. I may start painting her later! Well anywho,I have another recipe for you guys, try it this weekend and let me know what you think! It is my very own!


Baked Chicken Curry

What you will need?

Chicken Breast, or Any Chicken you have
Curry Powder
Pepper
Lemon Pepper
Garlic Salt
1-2 can Coconut Milk
Garlic
Parsley Flakes

Baking Pan
Sauce Pan

Preparation

Minced Garlic

Sprinkle Curry Powder, Garlic Salt, Pepper, and Lemon Pepper to your Chicken


Let's Cook

In the Deep Sauce pan, sautee your garlic and then add your chicken! (We are only frying each side of the chicken...it is going to cook more in the oven!)

Once they chicken is cook from the outside, add the sauce. Add more curry to it...depending how much you like it ( I LOVE CURRY)

Take your baking pan, and place the chicken side by side, and pour the coconut milk with it.

In the medium sauce pan, you want to start boiling the coconut milk and the curry powder together, until it becomes really thick. I like to put red pepper flakes for a little heat.

Use garlic salt and pepper as needed!

Once your chicken in the oven is cooked, Add the coconut from the BAKING PAN into the SAUCE PAN.

Let it boil until it thickens. The juice from the chicken will give the curry sauce more flavor. Add a little Parsley Flakes into the sauce. Do not be afraid to add a little bit of this and a little bit of that, you know your taste buds, and what your family likes more than I do!

Set your chicken in a Huge Plate (big and deep enough for sauce too!) Pour the sauce all over it and Voila!

It should look like this! 


I love serving this over Jasmine Rice. You can't go wrong with that!

Let me know if you have any questions. Have a great weekend!

Thursday, April 26, 2012

Painting 101 from Yours Truly

It is getting warmer outside...at least in other parts of the country...we still have our cold days here! Anyways, many of you are probably spring cleaning, and going to a lot more garage sales...now what to do with your treasures. Give them a new look with paint! I used to go to this little vintage/antique store in Old Elk Grove where we used to live in California...I always chat with the owner. I love her pieces, and she always tells me little tips on how she paints her furniture. She even gave me her WORLD WINNING recipe for Chili in 2004! Anyways, her and I have very similar style even when it comes to painting, I know one of my idols do too! I will talk about her more in the future!
When I get a piece of furniture, all I want to do is paint, paint, paint. By no means I am a lazy person, but if I do not have to sand a piece, I skip right to Primer, and then Paint. But now, I have been investing in Primer + Paint in One. Some of antique and vintage pieces, I rarely sand unless they are chipped....I do not like to mess with the grain underneath...why? It helps preserve the history of your furniture. Besides, I love the imperfect look of furniture...that is what Shabby chic is all about isn't it? My style is not perfect, but I make sure my pieces have character!

STEP 1: Take it apart. Remove all doors, hinges, knobs...if it does not have any...skip this step!)

TIP: Get a wood filler, ALWAYS! You never know when you will need it! Like, if you want to turn HANDLES into PULLS...you can fill the holes, and sand it evenly. Drill a new hole, and you can simply put one knob in it now!

 STEP 2: PRIME....when I use separate primer...I like to use the spray kind! If you find the PRIMER and PAINT in ONE for cheap (mistint or returned paint section of your local hardware store), go to STEP 3.

STEP 3: Either you can paint now, OR....this is a big one...if you want that old, chipped paint look (like the paint is lifted and can be peeled off), RUB wax (I use candle wax) or bar of soap on areas you want it too look chipped. I go for the edges, by the doors...feel free to do it....How will you know where it is after you have painted over it???? Well, the bumpy raised ones are the ones you applied the wax with

FYI: Satin Paint will always be my preference...it is more durable than eggshell!


 STEP 4: If you like distressing your furniture like me, sand edges..or the intricate design parts of your piece. What part of the furniture will you most likely brushed on when you walk by it?? Remember, if you like the old chipped, paint look, you have to get either a) razor blade 2) scraper. I rarely do the chipped paint so just used a razor blade...

STEP 5: IMPORTANT STEP: PLEASE DO NOT SKIP THIS STEP! You are almost done, I promise! Apply a finishing coat...there are many out there and I do not want you guys to get confused walking down that aisle, so here it goes!

 If your piece is white, be careful using oil base paint, it will turn yellow maybe not now, but eventually. I am weird though, I kinda like the aging look of white...as long as it is not  completely yellow!

Polyurethane comes in squeeze in a tube like a toothpaste, or it just comes in paint can. I like the squeeze in better, it allows me put my piece of furniture inside the house, and just finish it completely later! Oil base or water base? It is up to you!

One of my favorite is TUNG Oil. It is very inexpensive, but it gets the job done. It penetrates through the wood to make a long lasting finish. All you need is cloth rub here and there, and VOILA!

That is it for now...Remember, this is not rocket science...its art fun! Just go for it! I use to tell my art kids IT DOES NOT HAVE TO BE PERFECT! Sometimes those pieces are the pieces you will learn to love!

Now if you have any questions, just ask, and just PAINT!

The Anniversary Gift


A couple weeks ago, I went to the Minot Flea Market in search of a hutch. My wedding anniversary is coming up and I have my mind set on what I wanted as a gift. I did not want jewelry, chocolates, dinner, card, etc..ALL I WANT IS A HUTCH! I am losing sleep over it, and I would look everywhere for one...then I saw her, she was the only hutch there!..she is not as big as I would want her to be, but she would be perfect since my space is becoming limited due to my furniture addiction. If you want a particular furniture in this town, if you see it, you get it, or else you might miss out on what could be a really great piece...someone will snag it really quick! I got her from the flea market vendor name Mike, and he had some other pieces that I would have wanted but this is the one I wanted to take home with me...at least from Mike anyway..I bought a few more things from other vendors that I will show you guys very soon. This hutch is solid wood, and she is an antique. I wanted to do something different for this hutch so she would fit right in with the rest of my house...I painted her white, and added a bluish-green wash on top, distressed her quite a bit. Instead of painting the whole thing white, I decided to paint the inside of the hutch the bluish-green paint that I have....I am still debating whether to replace the metal knobs with glass, or not...but I kinda like it the way it is. I also have to replace the light bulb too! But here she is! My Four year Anniversary gift!


 Before Picture                      

I am glad that I decided to pain the inside a different color! It helps this piece  stand out!


Here are some teacups that I purchased from the thrift store. I love little rose teacups, I found little spoons to go with them too! They were only $1 there too!

Wednesday, April 25, 2012

"Coreen" Armoire

Before I got this armoire, it took a lot of negotiating with "Coreen." She did not want to come down on her price, but because it was a piece that people did not care for, she reposted it up for sale again in the yard sale, and finally took my original offer. We met her in her tiny storage unit, and her sweetness and story made me realize this piece was worth every penny she was asking for. Her family lost all their belongings in the Minot flood. She is renting a storage unit waiting for a house for her and her family. When we tried to load the armoire, it did not fit because we had my daughter with us, and we could not take the seats down with her car seat...anyways, she offered to give us her storage unit key, and to pick it up the next day! That was so nice, and she trusted us, she must have felt that we are good peeps, and WE ARE! Two weeks ago, I went to the thrift store with my mini family, and my best Minot girl and her family to the flea market....a sweet lady came up to me and says, "What did you end up doing with the armoire?" It was her..my Coreen. I showed her a picture...and gave her the biggest hug...I have a feeling I will be running into her, here and there...she is looking for pieces to have in her home too! So my friends, here it is the one and only "Coreen" armoire: In the lightest shade of pink, distressed, and fancied up in glass knobs...it would be perfect for a little princess room too :) Right now, it is in our family room and my daughter enjoys watching her fairytale movies in it!

Sitting on top, is a $ 0.25 craft glass I found at Joan Fabrics when we still lived in California...The branches are from my husband's uncle's ranch in Menifee, CA (can you believe they made it with the move)  I added a few flowers and roughly painted the branches white! Stick in the glass and Voila!
 The books are vintage volumes of "The Book of Life" 
 31st Edition, 1968, Printed in the good Ole USA! $7 for all 9 of them!
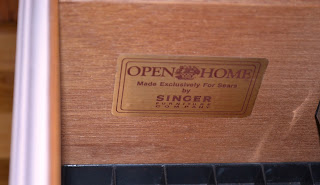
The Armoire was made by Singer!

Before and After Pics


My own take on Fipino Beef Steak

I was debating whether to post recipes or not...not because of me, but because of my husband. He is stingy especially when it comes to sharing his favorite Filipino recipes made by yours truly. He always says "We should bottle it up, and sell it." He is my biggest supporter, and he has so much more ideas for me than I ever could for myself...but anyways, here is a special post for those who wants to try some of my favorite Filipino dishes...Everyone has their way of cooking...I RARELY follow recipes..I love finding how to cook different foods on my own, put my own take on it, and making it my very own! Feel free to ask me questions...I may miss an ingredient or a step...Cooking is also a form of art to me...little bit of this, little bit of that..best of all its made with LOVE!

What you will need:

BEEF (any cuts, I prefer the ones with a little fat...you will learn why in a minute)
ONIONS (i like a lot of onions)
LEMON PEPPER
GARLIC SALT 
BLACK PEPPER
SOY SAUCE 
VINEGAR
GARLIC (put as much as you want)
RED PEPPER FLAKES (if you like a little bit of heat)
BASIL 
Canola Oil
Preparation:

Mince Garlic and cut Onions into rings!

Slice your beef thinly...when you cut the fat out..just leave some on some pieces!

In a mixing bowl, combine vinegar and soy sauce, and basil! If I am mixing these two together, I usually do 2/3 cups of vinegar 1/3 cup of soy sauce...Now, depending on your taste (taste before you put the meat in there)..Don't be afraid to add A little bit of this and a little bit of that!

Sprinkle Black Pepper, Lemon Pepper, and Garlic Salt in the pieces of Beef. And then soak it in your vinegar and soy sauce marinade.

Now, Let's Cook!

Drizzle Canola Oil in the pan! Wait for it to heat up, and then add your garlic. Take the beef out of your marinade and add it to the pan...Let's brown the beef up!

When The Beef is nice and brown, we will add the marinade...cook it in med-low...It does not mean that the beef if cooked from inside out, it is done...you have to wait until its tender...normally when meat is starting to cook in its own fat, where the marinade has been soaked up by the beef, its almost done!
(this is where it makes food extra delicious and flavorful)

Add extra minced garlic, and finally add your Onions in the end. Just sautee it with the beef and you are all done!

Serve with JASMINE rice! It is the best! Here's what it suppose to look like when you are all done! I made this for my hubby on Valentine's Day!


TIP: When you're cooking with vinegar, DO NOT KEEP MIXING...LEAVE IT ALONE! Couple pokes here and there to move the meet but never stir it! Just let it boil and it will do its magic!


Tuesday, April 24, 2012

Starting a Blog

Before I end the night by starting this blog, I wanted to share a few things with all of you??

Why did I start this?

Whenever I refinished a furniture, or just redecorated... I like to share it with our friends and family. I am proud of everything that I do, only because I put a lot of work into the things that I do...every interest, every hobby, I am very passionate about! Now, I get a lot of questions and compliments when I do post on Facebook, and even text messages from people...and I wish I can just go on and on about the history behind all these treasure pieces that I find. Well, now here is your chance to know what, when, where, why or how about my pieces! Feel free to ask me questions too!

When I purchase a piece from someone, I do not hand them the money (sometimes free..rare for me though)..and walk away...I get to know them and I ask where the piece came from. Depending on how much history it is on a piece...is how much work I actually put into redoing it...sometimes I may not redo it. Stick around to learn a few tricks and ideas on how to redo the pieces you bought and love!

I get asked this a lot, "Why am I not selling my pieces?" Our new home, right now we live on base..this home I  will always be proud of...I love almost everything about it (except the tiny bathrooms). The pieces I am purchasing right now is to complete our home...and honestly, the history of  most of the the pieces I purchase are PRICELESS...not to mention the work one does with refinishing each piece.

 I love yard sales, antiques stores, thrift stores...but I have to say I am not a JUNKIE! I pick pieces that are well structured, and worthy of being refinished...cost does not matter (even if I am cheap), remember, it is the history of the furniture! Before I buy, is it veneer? is it solid wood? what is the quality of the piece that I am buying?

First of DO NOT LET VENEER SCARE YOU! Veneer is  thin piece of wood that is glued on top to make some furniture hold up better, and made to make pieces look better. Some of the best quality furniture is made of veneer...especially those antique and vintage pieces! Veneer is still REAL WOOD! Now, if you get SOLID wood, it is even better, it is easier to refinish and very rare, especially when it is from way back when! But do not worry, I will have TIPS on how to refinish veneer!

Well, that is it for now, I am not going to give you the all the details all at once...besides I have to keep you guys wanting to come back :) As for now....toodles! Oh, here is a pic of my family just for me to share with you!

xoxo

The "Lake House Blue Dresser"

I absolutely love this piece...from the moment I saw her in the corner of someone's garage, in two pieces...she was not even together but I loved her, and I had to have her! (I should be writing a romance novel, the way this post started..lol) I saw a few pieces I liked from this lady selling a lot of antiques. They were all from her parent's Lake house they just sold.... I came there with a friend because this will be my first time picking up furniture, and I did not want to bug my hubby again to pick up MORE furniture...anywho, we got there, and I turned down many of the pieces that I originally wanted...and a small glimpse of this, I blurted ,"How much for this one?" All I get is "It is not for sale." I sadly gathered up the few pieces I wanted (which includes the stack tables I have on the pictures besides the dresser). I turned back around and said, "Can I make an offer?" (they were selling a lot of stuff for cheap, maybe I will get a good deal on this, right?) I did not want the end table that came with it...all I wanted was this piece...I named my price, and they said "Yeah, we will help you load it up." Because of my other purchases I was not able to load both pieces...and my hubby had to go back the next day to pick up the other pieces!

How I refinished this piece?

Before I go into it...here's a little TIP:
When I go to Menards or any hardware store, I always go to the MISTINT, or returned paint that people did not want. Big gallons are five dollars...I usually score the one that has PRIMER and PAINT all in one! Those paint can easily cost 25 and up..so I like to stock up when I see color that I want or would use...I like Satin Paint! I will be investing in the type of Paint I have been wanting to buy and try for awhile now...I will keep you posted...But here she is: Powder Blue, Slightly Distressed, and Original knobs spray painted in Dark Copper Bronze...finished her with Tung Oil!( Another Tip: If you use Tung Oil, and your working indoors..keep all windows open!)

Before and After Pic


I love the stack tables, the flower vases were from a yard sale for $10 for both, which can be found at Hobby Lobby for 29.99 each! 
 I love this color!
This display plate is very special! It was given to me by my husband's supervisor when we were stationed in Sacramento. She was always there for us and we could not really thank her enough..this was her parting gift for me before we left!

The "Wendell Brother" Desk

This particular desk is named after the guy I purchased the desk from...it was not his..but it was his brother's. Wendell was selling this desk for his brother who lost all his belongings during the flood in Minot. How did I come across Wendell? A website called Bisman...which is what Craigslist is in North Dakota. I saw this desk and it says "Make an Offer." Now, one thing I do not like about buying from "OBO (or best offer), or "Make an Offer," is naming the price. I know how much I would pay for the piece, but would I really want to pay that much especially for an antique or vintage piece that has so much history? YEAH!  Well, I gave it a shot. I messaged and said "$30.00." The lady messaged me back and accepted my offer, and told me that the desk was ready to be picked up from her parents house. I went there the next day with my hubby and my daughter, only to find this cute little old man selling his brother treasured items that has been saved from his home. It has so much history, I can almost picture his brother sitting by the desk, taking a break from writing..with his tobacco pipe. I only say this, because when I opened the table, I could smell the tobacco. Others would have been turned off, but little things like that add character...besides paint will kill that odor. Anyways, after chatting we said Goodbye to Wendell...hoping he will call me soon...his wife's Aunt's is moving...and she has many great pieces that I would love so he tells me...he keeps in touch...but I am still waiting on the "CALL." Till next time...here's the "Wendell Brother" Desk, white and distressed, with all the original knobs....Enjoy!!!

On top of the desk is a mirror I purchased when we first bought our condo back east in '07...it was on sale for 24 dollars at Homegoods...I never forget details ;)  Not sure if the desk will be staying in our living room or will be used as a vanity/desk in our bedroom...

 Look at the beautiful original drawer liners on this piece!