Saturday, May 5, 2012

The Play Kitchen Project

My daughter was turning two, and my husband and I both wanted to do something special for her. I know I wanted her to have a play kitchen. I started looking online, there are plastic ones, and the wooden ones, which I love. The prices, I did not. I would find one  that I liked, but then I would always find something I did not like about it, whether it is missing something that I wanted to have with it...and then it always goes back to the price...they are way overpriced. I started to noticed that most of them are built like an entertainment center...so why not make a kitchen out of one? I started my research, and I saw some that are made from end tables, and entertainment centers already. AWESOME. They gave me so much ideas...but I knew I wanted mine to be different. So, I started to go on Craigslist religiously looking for either a FREE entertainment center, or a really cheap one. And I found one, and it was perfect! It's pine wood, so it is light, and only for 20 dollars. 
Almost forgot to take a before Picture!
I had an idea in my head what I wanted it to look like, and it came out like this:


The backspash is painted in pale yellow and pink (Gallon each for 5 dollars, from the mistint section). I used fabric and modge podge for the doors including the fridge.

 My hubby and I came up with the wine rack. I had the idea on how to do it, and he helped me execute it. The wine glasses, of course are plastic, and I found them for really cheap at a discount party store.


 The curtains were hand-sewn from the left over fabric. This is before I got my sewing machine.
 The oven, we used a jig saw to cut the rectangle, and I simply placed a picture frame on top, and replaced the glass with plexi glass.
As for the refrigerator, the wooden shelves were replaced with plexi glass!
 Play food that was given to her for her birthday, everyone knew about our project!
 I wanted her to have a window, so I purchased a white picture frame from Goodwill. I used all her birthday cards, christening cards, baby shower etc. to cut out pieces to make the owl, the clouds, the trees, the stars. I had leftover canvas board from my art class that I used for this, I painted the background with blue glitter, and Voila!
This was the hardest part of the project. I did not see any idea online that I liked about doing the stove parts. I did not want them painted on, or modge podged. I wanted to create real-like burners. So, at home depot, I searched and searched. I had an idea of taking dowels and cutting them into pieces to make the lines of the burner. We bought tiles to place them in, and we flipped two of those tiles to make the grill (we spray painted it!) The round part of the burners are from carpet movers, I took out the felt to show the tin part of it. The knobs are cut from the wooden doors we took out! They turn too!
 This is all from Ikea. The cooking utensils, the towel holder, and the clips.
  The faucet we got from Habitat for Humanity for $5. And the sink, is an old baking pan I had laying around! The phone was $3 from Goodwill. The curtain below the sink is also hand sewn from three different scrap fabrics.
You see, a little creativity goes a long way. I love, love, love this kitchen. It is build to last, and my daughter enjoys playing with it. It is her very own kitchen made with love by Mommy and Daddy. This piece was definitely the start of it all! Enjoy!

ADOBO Pork Chops


This is what my daughter and I ate for lunch today, I wanted something quick and easy. I usually marinade this over night or even for a couple days for more flavor, but it still came out delicious. Filipino style Adobo is one of the most requested dish, the ingredients and steps to make it are simple, but it packs a lot of flavor. Instead of making ordinary pork chops, I decided to do make adobo flavored ones...try it! I promise you wont regret it.


What you will need!

Pork Chops (any cut, I prefer the one with the bone)
Garlic Salt
Minced Garlic (FRESH)
Pepper
Lemon Pepper
Vinegar
Soy Sauce
Sugar
Oil

Prepare

Coat the pork chop (each side) with garlic salt, pepper, lemon pepper, and sugar.

In a bowl, mix your vinegar and soy sauce, and just a little bit more sugar, maybe about a teaspoon.

Now, soak your pork chops in the marinade.

Let's Cook!

Put a little oil in the pan, and sear each side of the pork chops.

Once both sides are done, add the marinade that is leftover.

Cover it up, this will help your pork chops cook thoroughly, and become more tender.

Once it is starting to caramelize, open the lid, and let it cook some more until it is frying up.

Then, add your minced garlic.

It should look like this when it is starting to caramelize!


Once you see barely any marinade in the pan, you are done. (Please see pic on top of the page to see what the dish looks like when it is completely done.)

JUST A TIP: I usually eat this with rice, or fried rice. To give your rice a bit more flavor, try putting some of that white rice into the same pan you cooked the pork chops in!

Enjoy this recipe! Let me know how you like it. Have a great weekend!

Wednesday, May 2, 2012

Chicken Wired Dresser

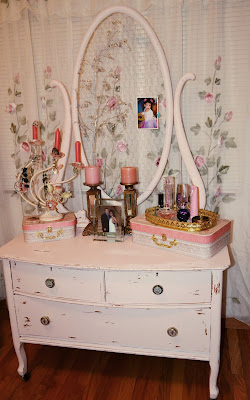
I bought this dresser at the yard sale site, and the lady we purchased it from gave us very little information about the dresser....this dresser belonged to her grandmother. She originally priced this dresser fairly decent, however no one took it...it may have been the mirror. It is antique, solid wood... but the mirror needed some TLC. To hire someone to desilver a mirror, EXPENSIVE...to Do it Yourself....EXPENSIVE. 

At first, I liked the mirror the way it was..ghosted and it displays how old this piece truly is...but it started to freak me out as a I lay in my "girly room" (guest bedroom).
What she looked like before!


 It took me awhile to decide what I wanted to do with, but I decided to just redo the whole dresser. I knew I wanted it to be the same pale pink color I painted the "Coreen" armoire (if you haven't seen it, please check it out!) I wanted it to look old. Should I just replace the mirror, should I not? Should I just remove the elegant harp that holds up the mirror? ABSOLUTELY NOT! But, I did not want to spend anymore money on it. I already replaced the knobs, but obviously it did not convince me enough to keep it the way it is. Well, I have seen old picture frames with chicken wire to turn them in to earring holders, picture holder, notes, etc. DUH, why not have a dresser that have just that...I can always have a mirror somewhere else in the room, right? Well, then here she is...looking pink, old and beautiful, with vintage inspired knobs...and chicken wired...hahaha


Curtains, courtesy of Mommy Dearest!

What you will need for a project like this!
My baby when she just turned 1!


My "Makeup" Storage

I hope everyone is having a great week! I took a break the past weekend from everything, I needed time to catch up with homework, and spend time with my daughter. But I am back! This piece I am about to introduce, is one of my FAVORITEST, FAVORITEST, piece ever. Yeah, I use that word.


This Secretary Hutch was found at 57th St. Antique Mall in Sacramento, CA. It was my first time going to this mall, I was in love. The first time I saw this hutch, I was in love. All the vendors were having a 20-30% sale. This was listed for $120, and it was on sale for 20% off, $96...plus tax. Before I got her, I did not realize the value of secretary hutches, I just adored her beauty. She was perfect the way she was...but I knew I had to vamp her up a little bit. I saw a smaller secretary hutch few weeks ago at the flea market, and the vendor had it for $869...insane right? I am very fortunate to get this piece for the price I did! 

For those of you who did not know this, I am also a make-up artist and I have had the opportunity to work for one of the biggest salon on the east coast, and a company under Estee Lauder, MAC cosmetics. Well the beauty of working at these places, you get gratis. YES, free makeup, skincare, brushes, etc. I MISS THIS! So along with me buying to add to my stash, I accumulated a great collection! And I needed a place where I can store my goodies...

 Anyways, here is my very own makeup storage...

 I slightly just brushed her with paint, and distressed her quite a bit.
 I do not think I will be getting rid of this piece...ever!


 Love the intricate details of this hutch, The brass glass knobs are perfect for her!

 My Sephora inspired brush holders! Just get some glass beads from the flower vase section, pour it in glass container, and Voila....now to fit my huge brush collection in these...that's another story!

I will post my collection, how I organize it once I go through my things...I haven't had a chance since we moved to Minot!

JUST A TIP: please, please do not have makeup sit in your bathroom or store it anywhere close...the moisture from the hot shower makes your makeup collect bacteria faster....and a lot of it!! And perfumes, as much as it looks really cute on top of your vanity, keep it where it get minimal light, and store it in a cool place...it lasts longer!